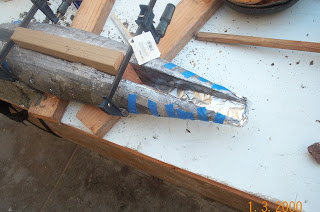
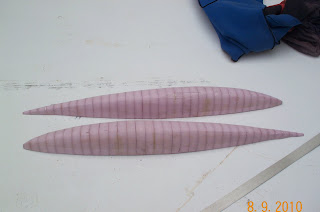
So today after work I decided to try and add some weight to my bulb, by pouring between the two halves. I had read on one of the other blogs where they sealed between the two halves with aluminum duct tape, and I figured I could do something like that...
Of course, I couldn't expect a couple of layers of aluminum foil to hold molten lead for long, so the next step was to pack some sand under the bulb. And yes, that's a piece of 2x6, cut to the length of the foil, to act as a spacer. My foil should just about slide right in there, then I plan to through bolt it and epoxy it in place
Here it is with the sand packed under and around the front half of the bulb. Sorry I didn't get pictures of the actual pour, not enough hands!
And voila! A one piece bulb with a notch out of the middle, weighing in at 172 pounds. I figure if I have to I can add 5 or 10 pounds under and around the foil, but for now I think I might be coming in really close, as the rules say the entire keel has a max weight of 185 lbs, so I have to make sure my foil can't weigh more than 12 lbs including glass. plus i still have to shape and fair this thing!
Tuesday, September 28, 2010
Saturday, September 18, 2010
Underweight!
So I finally got to pour the other half of the bulb today, don't ask me why it took so long. Anyway, after pouring I waited a couple of hours, then flipped the mold over, and they popped right out! I weighed them, they come in at about 140 lbs, a lot less than they should have. I think I should have enlarged the patterns, but as they say, too late now! So what i plan to do is use a part of the foil as a spacer, and do the aluminum tape trick so I can pour between the two halves to fill the 1 3/8 inch gap, and get it closer to the correct weight.
Once again, lots of slag, steel clips, and alloy weights that wouldn't melt!
I hope I can get this done soon, I am so ready to start cuttiing wood!
Monday, September 13, 2010
"Get the Lead Out!'
What a happy day! On the way to work my truck broke down(awwww...) so I was able to get a little done today. Of course, I was compulsive and didn't really plan it out!
Here's where I got to on Saturday, mold poured and curing.
And here we are Sunday, ready to pour!
So you can see why when I couldn't go to work today,(awww.....), I decided to jump right in and pour some lead! My lead supply is old tire weights, probably the dirtiest form of lead you can find out there. What surprised me, though, is that not all the were lead! Some were aluminum, some were even steel. And it seemed there were several different alloys used, as some were harder to melt than others. The easiest to melt were the flat stick-on weights used for custom rims, but they also stank the most, as they had plastic on them. And of course, all the other weights had those little metal clips in them. I recommend that if you use wheel weights, try to get the biggest ones you can, or else you'll feel like you're spending all your time fishing out those clips! I finally gave up. I'd melt a pot of weights, then pour straight from the pot, holding back the clips with the slag, then just throwing out everything left in the pot and starting a new batch.
The secret weapon to all this was my trusty torch burning MATT gas!
I learned a few things I'd like to share: When I started pouring the lead, I found that if I poured too fast, the lead would pop like grease in a frying pan, and splatter all over. And I found that I could get rid of most of the cold joints by keeping the lead in the mold hot with my torch, and keeping the time between pours short. And finally, that if you use wheel weights, get about 300lbs or more, because you'll be throwing out a LOT of slag and steel!
Here it is, the first half of my bulb!
Hopefully I'll get the other half poured tomorrow, then it's on to cutting ply!
Thursday, September 9, 2010
What have i been doing?
Well, to be honest not much. I finally shaped the keel, using two different methods and a multitude of tools. On the first side, i used the old auto body trick of spray painting the surface, then planing/sanding the high spots until the paint is gone, then repeating the process until there are no more high spots.
On the other side I used saw cuts to the depth of the wood I needed to remove. Both methods worked well, although I had a little trouble with the leading edge when I used the sawcuts. The final thickness is about 1 and 3/8 inches, a lot less than I was expecting. So just to make sure, I put the keel across the sawhorses and sat on it (210 lbs). Very little flex, and the piece you see in the pictures is 8 feet long! I wanted some exta so I can have cutoffs to play with when I cast the bulb.
Speaking of the bulb, I finished the bulb plug, and this weekend cut it in half.
I made the mistake of making my first plug too short, so I scrapped the mold and started over. I should have paid attention when everyone was talking about the extra piece the first time! But it's finally done again, and tomorrow I'll be setting the plug. I've been using mortar mix, it works well and has few voids, and it's cheap! Downside is you really have to fight the boyancy of the plug.
This is my bandsaw setup cutting the plug. Portable bandsaw clamped to a piece of wood!
And here they are, ready for tomorrow!
Saturday, September 4, 2010
It Begins....
Although to be honest it began a long time ago, when I first saw the i550 Tokyo Trash Baby on Sailing Anarchy, and said to myself, "I can do that!" I'll try to post as often as I have something to show. In the meantime, I have to learn how to use this blog stuff, so hopefully I can post something this weekend. Have a good one!
Subscribe to:
Posts (Atom)


